There is a quiet joy in watching the seasons change from my kitchen window, where the light shifts across the old wooden table. Baking these cookies feels like capturing that simple, natural comfort—transforming humble ingredients like flour, butter, and real vanilla into something warm and abundant that smells like home.

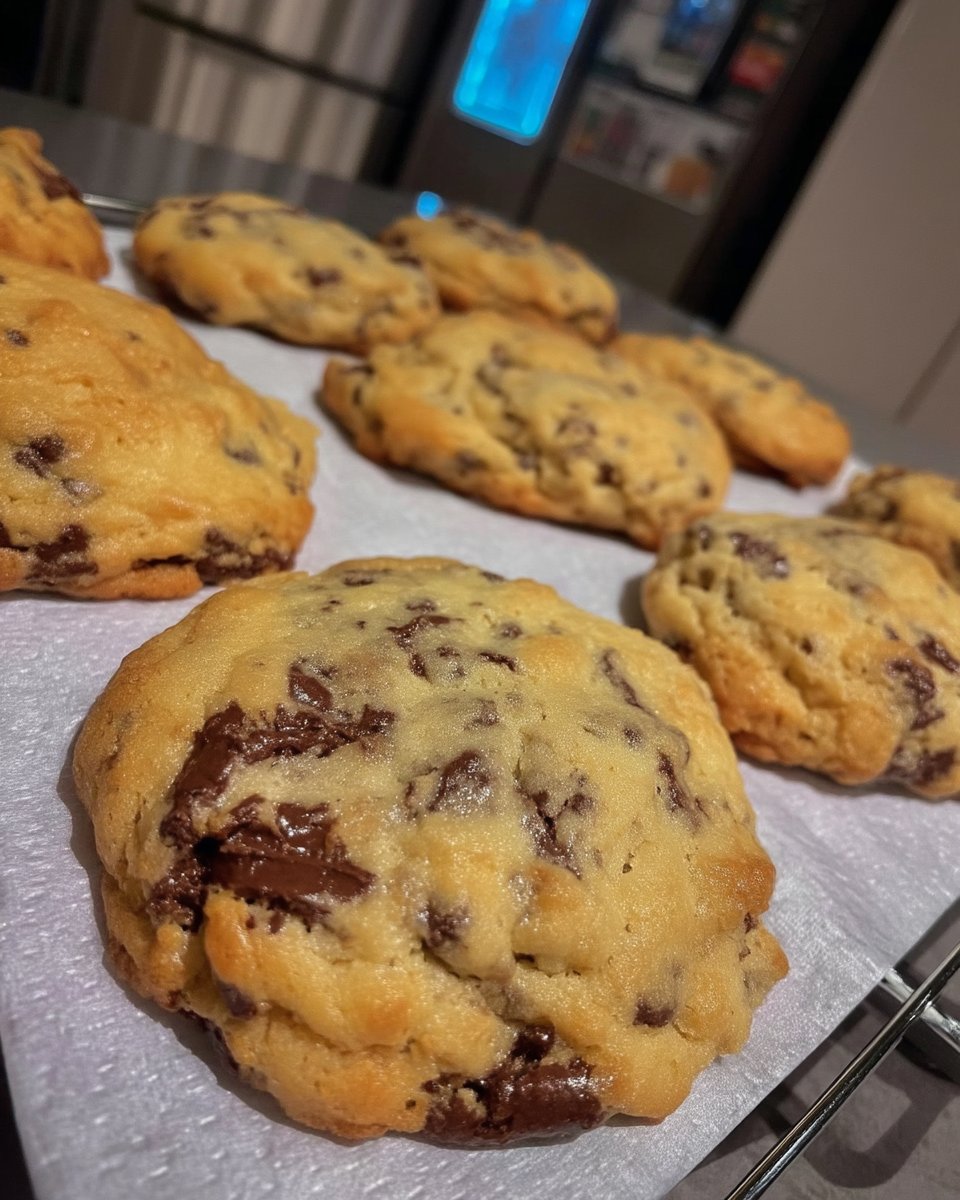
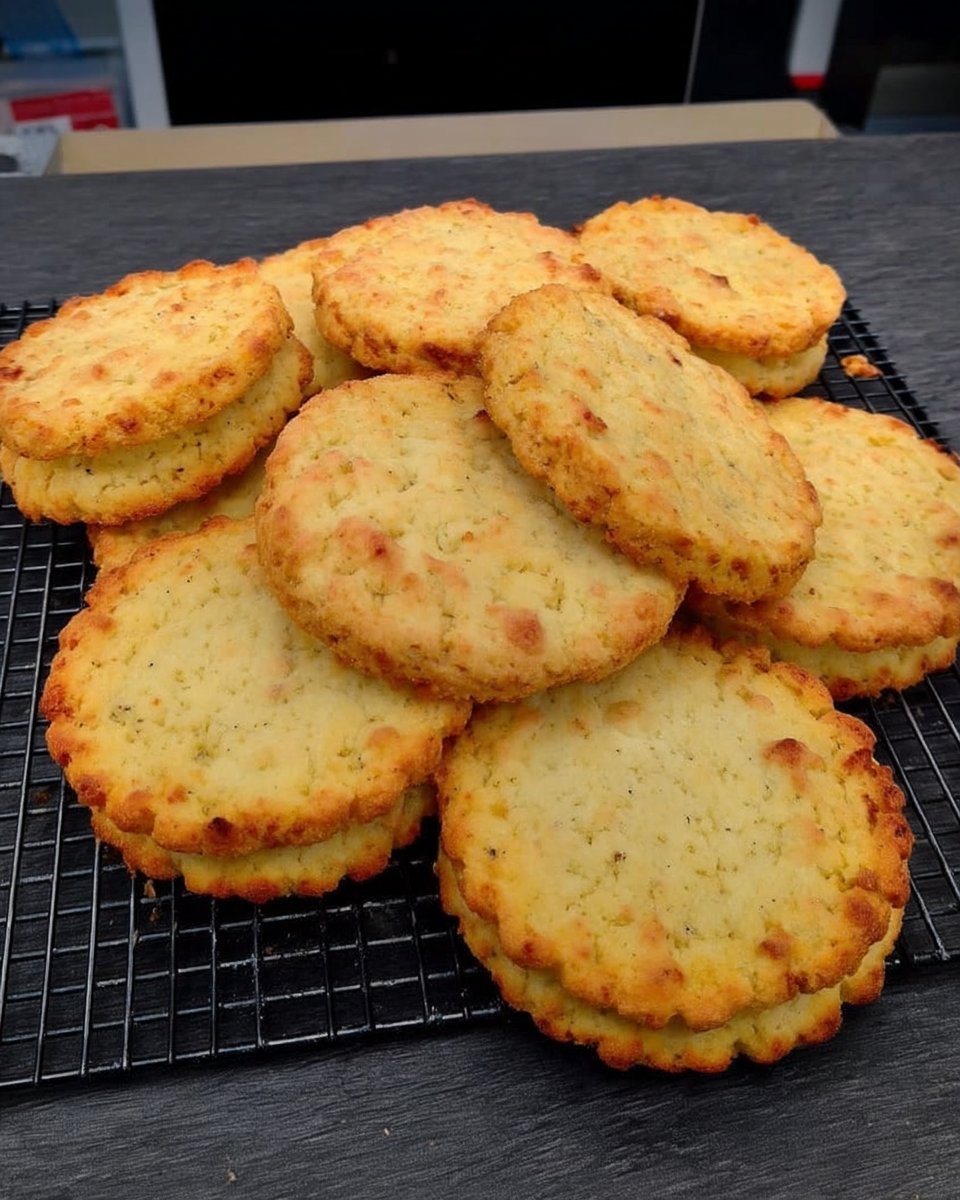
These bakery style chocolate chip cookies are everything a homemade treat should be—thick, chewy, and generously loaded with semi-sweet chocolate. By using cold butter strategies and plenty of patience, we create a wholesome treat that balances natural beauty with indulgent flavor.
A Wholesome Slice of Comfort
You will love how these cookies balance a crisp, golden edge with a soft, gooey center that stays fresh for days. We celebrate natural abundance here, packing every bite with rich chocolate and the warmth of dark brown sugar. It is a recipe that honors the process, proving that real ingredients and a little time yield the most beautiful, bakery-quality results right in your own farmhouse kitchen.
Print
Bakery Style Chocolate Chip Cookies
- Total Time: 2 hours 25 mins
- Yield: 24 cookies
- Diet: Vegetarian
Description
These bakery-style cookies offer a sophisticated blend of crisp, golden edges and a rich, chewy center. Packed with two full cups of semi-sweet chocolate and warm vanilla, they provide an abundant, wholesome treat that tastes like it came straight from a professional farmhouse kitchen.
Ingredients
- 1 cup Unsalted Butter, room temperature
- 3/4 cup Granulated Sugar
- 3/4 cup Dark Brown Sugar, packed
- 1 tablespoon Pure Vanilla Extract
- 2 large Eggs, room temperature
- 3 cups All-Purpose Flour
- 1 teaspoon Baking Soda
- 1 teaspoon Baking Powder
- 1/2 teaspoon Salt
- 2 cups Semi-Sweet Chocolate Chips
Instructions
- Cream the room temperature butter, granulated sugar, and dark brown sugar in a mixer on medium speed until the mixture is pale and fluffy.
- Add the vanilla extract and eggs, continuing to mix until the dough is smooth and glossy.
- In a separate bowl, whisk together the flour, baking soda, baking powder, and salt.
- Set the mixer to low and slowly incorporate the dry ingredients into the wet mixture, mixing only until just combined.
- Fold in the semi-sweet chocolate chips using a spatula or by hand until evenly distributed.
- Scoop the dough into 3-tablespoon mounds, place on a tray, and refrigerate for at least 2 hours to set the fats.
- Preheat your oven to 375°F (190°C) and line baking sheets with parchment paper.
- Arrange the chilled dough balls with ample spacing and bake for 9 to 12 minutes until the edges are golden but centers remain soft.
- Immediately after baking, use a large round glass or cookie cutter to gently swirl around each cookie to create a perfect circular shape.
- Let the cookies rest on the baking sheet for 5 minutes before transferring to a wire rack to cool.
Notes
To achieve the signature bakery thickness, do not skip the refrigeration step; chilling the dough for at least two hours is essential to control the spread in a hot oven. For the best flavor profile, use high-quality dark brown sugar, as its higher molasses content contributes to the deep caramel notes and moist texture of the finished cookie.
- Prep Time: 15 mins
- Cook Time: 10 mins
- Category: Dessert
- Method: Baking
- Cuisine: American
Find it online: https://cookiescharm.com/bakery-style-chocolate-chip-cookies/
Fresh Ingredients for Natural Abundance

- Unsalted Butter: We use room temperature butter to build a creamy base that holds the structure beautifully without being too oily.
- Sugars: A mix of granulated sugar and packed dark brown sugar creates that deep, caramel-like flavor and chewy texture we crave.
- All-Purpose Flour: Spooned and leveled to ensure the dough isn’t too heavy—just enough to hold all that chocolate.
- Semi-Sweet Chocolate Chips: Two full cups of real chocolate ensure that every single bite is loaded with pockets of melted goodness.
- Pure Vanilla Extract: A tablespoon of real vanilla brings a floral, aromatic warmth that rounds out the sweetness naturally.
- Eggs: Two large eggs at room temperature bind everything together for that perfect bakery-style richness.
The Natural Baking Process
Step 1: Cream the Butter and Sugars
Start by placing your room temperature butter, granulated sugar, and dark brown sugar in a mixer. Cream them together on medium speed until the mixture is smooth, pale, and fluffy. This introduces air for a lighter bite. Add the vanilla and eggs, mixing until the dough looks glossy and smooth.
Step 2: Incorporate Dry Ingredients
In a separate bowl, whisk together the flour, baking soda, baking powder, and salt. Turn your mixer to low speed and slowly add this flour mixture to the wet ingredients. Mix just until the dough comes together—stopping here ensures your cookies remain tender rather than tough.
Step 3: Fold in the Chocolate
Remove the bowl from the mixer and pour in the semi-sweet chocolate chips. Use a sturdy spatula or your hands to fold the chocolate in, distributing it evenly throughout the dough so every cookie is abundant with chips.
Step 4: Chill the Dough
Scoop the dough into 3-tablespoon mounds and place them on a baking sheet. Cover and refrigerate for at least 2 hours. This step allows the flour to hydrate and the fats to solidify, preventing the cookies from spreading too thin in the oven.
Step 5: Bake to Perfection
Preheat your oven to 375°F (190°C). Arrange the chilled dough balls on a parchment-lined baking sheet, spacing them well apart. Bake for 9–12 minutes. You want the edges to be golden brown while the centers remain pale and soft.
Step 6: The Perfect Swirl
Immediately after removing them from the oven, place a large round cookie cutter or glass over each cookie and gently swirl it in a circular motion. This tucks in the edges for a perfectly round, bakery-style finish. Let them cool on the sheet for 5 minutes before moving to a wire rack.
Christine’s Fresh Baking Secrets

To ensure your cookies are thick and gooey rather than flat, keep your dough cold. If your kitchen is warm, put the baking sheet in the fridge between batches. Also, if you want that true “wholesome loaded” look, press a few extra chocolate chips onto the tops of the dough balls just before baking. For more inspiration on creating thick, bakery-quality treats, check out our Ultimate Cookie Favorites collection.
Seasonal Swaps and Natural Ideas
- Nutty Crunch: Fold in a half-cup of toasted walnuts or pecans for an earthy texture that pairs beautifully with the chocolate.
- Dried Fruit: Add dried cherries or cranberries for a pop of natural color and tartness that cuts through the rich sugar.
- Salted Finish: Sprinkle a pinch of flaky sea salt on top right after baking to highlight the natural sweetness of the chocolate.
For more ideas on how to dress up your baking for special occasions, explore our Festive Cookie Moments.
How to Serve With Natural Flair

These cookies are best served warm, just minutes after they have set, allowing the chocolate to remain melty and vibrant. Arrange them on a wooden board with a glass of cold milk or a hot cup of coffee for a simple, rustic presentation. They also make fantastic ice cream sandwiches—just press a scoop of vanilla bean ice cream between two cooled cookies. See more beautiful presentation ideas in our Showstopper Cookie Designs.
Baking with Natural Joy
There is something deeply satisfying about pulling a tray of these golden, chocolate-loaded cookies from the oven. They remind us that the best flavors come from real ingredients and a little bit of patience. We hope this recipe brings a touch of farmhouse warmth to your kitchen. For more quick and delicious recipes, visit our Quick Cookie Solutions page.
Share your beautiful creations with us on Pinterest, Instagram, and Facebook!